
📰Getting Started | ⭐**Updates |** 📝 Guides | 🔢 API | ❓FAQ
Web Editor Basics
HoloLens
Mobile
Meta Quest
Chapter Series Documentation
Assets
Scripting
Enklu Embedded
API Reference
Release Notes
FAQ
Contact
When designing experiences, you will spend most of your time in the Web Editor.
The Web Editor is where the magic happens. There are a lot of pieces here, but they'll soon become familiar.
At the top of the page, you will see 3 drop-down menus: Experience, Edit, and Help.

The Experience drop-down menu lets you create a new experience, open the My Experiences window, or display a login QR code.
The My Experiences window contains a list of all experiences currently available to your account. For more information about the My Experiences window, please see our Managing Your Experiences article.
The Hololens Login lets you access a generated QR code link to your experience. This QR code can be scanned by HoloLens to log the device into your experience.
The Edit drop-down menu lets you undo or redo a previous action you've made in your experience. Instead of using this drop-down menu, there are also hotkeys available: [CTRL] + [Z] will undo an action, [SHIFT] + [CTRL] + [Z] will redo the most recently undone action.
The Help drop-down menu links to our Online Help documentation, our JS API Reference documentation, and a Support forum for suggesting new features or reporting issues.
The hierarchy is essentially a tree view of your experience. Everything in your experience is part of this tree in one way or another: assets, lights, and scripts all become nodes on this tree.
Once an experience becomes a bit more complicated, this will be an easy way to make sense of the space.
These nodes may also be re-positioned on the tree (also called re-parenting) by simple drag and drop. This is useful not just for organization, but also informs position, rotation, and scale changes, as these are composed down the graph. The lock and visibility icons are also informed by the hierarchy.
Finally, clicking on the ellipses will bring up the element menu from which you can perform several actions.

Using the search bar labeled “Filter” above the hierarchy, you can search directly for elements in your experience. The filter query string is matched by:
The filtered result will show list of elements for which the filter query string qualifies either one of these 4 conditions.
Writing the asset’s name in the filter bar will bring up any assets with that name in the hierarchy, and hide anything that doesn’t match.

Searching for script name, or script content filters out elements carrying that data.
For example: searching for “phrases” shows 4 elements elements - TEST1, TEST2, … - these elements have the “phrases” script attached to them
Screen Recording 2024-07-08 at 3.13.50 PM.mov
Another example: searching for “msgAssetsDownloaded” shows “New PR Launcher” elements because “LoadExperience” script attached to the element is listening for “msgAssetsDownloaded” message.
Screen Recording 2024-07-08 at 3.35.46 PM.mov
The library section enables you to manipulate all resources of the app. At the top, you can choose between categories of assets and scripts. Several categories of Public Assets are available.
The filter bar at the top of the library enables you to search through the assets.
To import your own assets, please see our Import Your Own Assets article.
To create and edit scripts, please see our Introduction to Scripting article.
When you're ready to edit an element in the hierarchy, click on it. This will open up the inspector on the right-hand side.
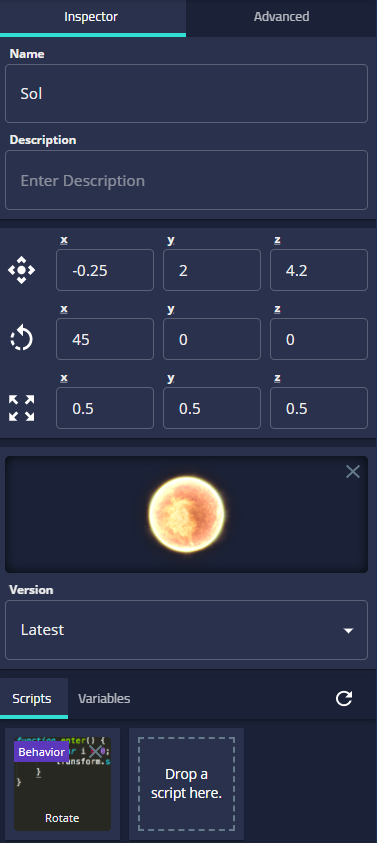
The inspector allows you to edit the properties of an element, as well as manage the attached asset and scripts. You can easily edit the name, description, and transform values here.
The canvas is your 2D view into a 3D world. The canvas provides a preview of assets and scripts, basic asset manipulation controls, as well as controls to move a camera around the world.
You can select an object by using your mouse's Left Click. Selecting an object on the canvas will also highlight its location in the hierarchy and reveal its properties in the inspector. Position, rotation, and scale may be manipulated via the tools in the upper left corner of the canvas. There is also a fullscreen button in the upper right corner of the canvas.
You can zoom in and out using the Scroll Wheel on your mouse. You can pan the camera by pressing and holding the Scroll Wheel (middle mouse button) while moving your cursor. Holding Right Click and dragging will rotate the camera.
Alternatively, there are some keyboard controls for moving the camera. While holding Right Click on the canvas, [W] will move the camera forward, and [S] will move the camera backward. To pan the camera while Right Click is held down on the canvas: [E] will pan upwards, [Q] will pan downwards, [A] will pan left, and [D] will pan right.
Next: Minimum Requirements